ผ้าใบเป็นวัสดุที่ได้รับความนิยมอย่างมากและเป็นวัสดุที่ให้ความเป็นไปได้ในงานฝีมือมากมาย หากคุณกำลังมองหาการเพิ่มความเรียบง่ายให้กับบ้านของคุณหรือคุณชอบเพียงแค่รูปลักษณ์ของผ้าใบมีหลายสิ่งที่คุณสามารถทำได้!
 เราได้รวบรวมรายชื่อโครงการ DIY ง่าย ๆ 100 ชิ้นที่คุณสามารถทำได้ด้วยผ้าใบ ตั้งแต่กระโปรงเตียงและผ้าม่านไปจนถึงหมอนกรอบรูปและแม้แต่ชุดแต่งงานคุณสามารถรวบรวมงานฝีมือผ้าใบเหล่านี้เข้าด้วยกันและตกแต่งบ้านของคุณหรือมอบให้เป็นของขวัญได้อย่างง่ายดาย
พื้นที่หาง่ายและราคาไม่แพงนัก (คิดว่าเป็นกระสอบมันฝรั่ง) หรือคุณสามารถซื้อได้จากร้านขายงานฝีมือในพื้นที่ของคุณและในทุกวันนี้ก็มีสีให้เลือกมากมายเช่นกันดังนั้นแม้ว่าโดยทั่วไปคุณจะไม่ชอบสีน้ำตาลก็ตาม สามารถหาสีอื่น ๆ เพื่อให้งานฝีมือของคุณสมบูรณ์ คว้าพื้นที่นั้นและเริ่มต้นในโครงการที่น่าทึ่งเหล่านี้
หมอนผ้าสักหลาดลายดอกไม้
หมอนใบนี้เป็นวิธีที่สมบูรณ์แบบในการเพิ่มเสน่ห์แบบชนบทให้กับห้องนั่งเล่นหรือห้องนอนของคุณ ไม่ว่าคุณจะวางไว้บนโซฟาหรือใช้เป็นหมอนรองนอนก็น่ารักและทำง่ายมาก ดอกไม้สักหลาดเป็นส่วนที่ซับซ้อนที่สุด แต่ก็ค่อนข้างง่าย คุณต้องมีพื้นที่เพียงพอที่จะสร้างหมอนและแน่นอนว่าการบรรจุ วิธีนี้เป็นเรื่องง่ายมากที่คุณอาจต้องการจัดวางโซฟาหลาย ๆ ตัวและคุณสามารถปรับเปลี่ยนขนาดให้เหมาะกับความต้องการเฉพาะของคุณได้
คำแนะนำ DIY - Bet1975
ผ้าใบผ้าใบ
นี่เป็นโปรเจ็กต์ที่ยอดเยี่ยมที่เหมาะสำหรับเก็บรูปถ่ายหรือแม้แต่บันทึก คุณสามารถแขวนไว้ในห้องครัวและใช้ที่หนีบผ้าเพื่อจดบันทึกเกี่ยวกับกำหนดการหรือเหตุการณ์สำคัญ คุณจำเป็นต้องซื้อผ้าใบซึ่งคุณสามารถหาซื้อได้จากร้าน Dollar Store ในพื้นที่ของคุณและคุณจะต้องใช้ริบบิ้นหรือผ้าอื่น ๆ เพื่อยึดผ้าที่ใส่รูปถ่ายหรือกระดาษโน้ตของคุณ คุณสามารถรวบรวมสิ่งนี้ทั้งหมดเข้าด้วยกันได้ภายในเวลาไม่ถึงหนึ่งชั่วโมงและเหมาะสำหรับการเก็บสูตรอาหารหรืออะไรก็ได้ที่คุณต้องการใส่ลงไป
คำแนะนำ DIY - Akadesign
Burlap Tote กับ Shabby Rose
คุณไม่สามารถมีกระเป๋าโท้ตได้มากเกินไปและใบนี้ทำมาจากผ้าใบทั้งหมดลงไปที่ดอกกุหลาบโทรม ๆ ที่น่ารักที่ด้านข้าง คุณสามารถวางดอกกุหลาบได้ทุกที่ที่คุณต้องการ แต่ดูดีมากที่อยู่ติดกับสายคล้อง โปรดทราบว่าคุณจะต้องใช้ผ้าเพื่อปกปิดด้านในเว้นแต่คุณจะไม่ต้องการให้ผ้าคลุมหมด นอกจากนี้ยังจำเป็นต้องมีการตัดเย็บเล็กน้อย แต่แม้กระทั่งสำหรับการเริ่มต้นท่อระบายน้ำนี่เป็นโปรเจ็กต์เล็ก ๆ ที่ยอดเยี่ยมที่จะไม่ใช้เวลามากเกินไปและจะทำให้คุณมีกระเป๋าสวย ๆ ที่คุณสามารถใช้ที่ชายหาดในฤดูร้อนนี้
คำแนะนำ DIY - Lamaisonreid
ผ้าปูโต๊ะและผ้าลูกไม้
ช่างเป็นวิธีที่สวยงามในการแต่งโต๊ะล้ม! ผ้าลูกไม้และผ้าปูโต๊ะนี้ทำง่ายพอ ๆ กับความสวยงาม คุณสามารถใช้ในช่วงฤดูอื่น ๆ ได้ แต่จะเหมาะสำหรับมื้อค่ำในฤดูใบไม้ร่วงหรือแม้แต่วันขอบคุณพระเจ้า เป็นโครงการที่เรียบง่ายเช่นกัน คุณเพียงแค่ต้องตัดผ้าใบของคุณแล้วเพิ่มลูกไม้ คุณสามารถทำให้กว้างขึ้นได้โดยเพิ่มลูกไม้ที่กว้างขึ้นหรือเพิ่มขอบลูกไม้บาง ๆ เพื่อให้เล็กลง คุณยังสามารถสลับความยาวเพื่อให้พอดีกับความยาวโต๊ะของคุณได้ซึ่งจะดีมากสำหรับโต๊ะกาแฟหรือโต๊ะเครื่องแป้ง
คำแนะนำ DIY - การเฉลิมฉลอง
แจกันพื้นที่ชนบท
แจกันสวย ๆ นี้ทำด้วยกระป๋องรีไซเคิล คุณเพียงแค่ทำความสะอาดกระป๋องให้สะอาดจากนั้นจึงทากาวบริเวณรอบ ๆ คุณจะต้องตัดผ้าออกเพื่อให้แน่ใจว่าพอดีกับความยาวที่พอดีแล้วปิดทับด้วยริบบิ้นผ้าซาตินหรือลูกไม้ที่สวยงาม คุณยังสามารถถักท็อปเปอร์และใช้ริบบิ้นผ่านสิ่งนั้นได้ สิ่งเหล่านี้เหมาะสำหรับงานแต่งงานที่ถือดอกไม้ไว้บนโต๊ะหรือคุณอาจมีเพียงไม่กี่คนนั่งอยู่รอบ ๆ บ้านในฤดูร้อนนี้ที่ถือดอกไม้ป่าน่ารัก ๆ กาวร้อนเพียงเล็กน้อยจะยึดพื้นที่และริบบิ้นให้เข้าที่อย่างสมบูรณ์แบบ
มีจำหน่ายที่: แจกันชนบท Etsy Burlap
ผ้าม่าน
ลองจินตนาการถึงรูปลักษณ์แบบชนบทที่บ้านของคุณจะมีเมื่อคุณสร้างผ้าม่านผืนผ้าใบที่สวยงามเหล่านี้เพื่อแขวน ไม่ว่าคุณจะต้องการบางสิ่งบางอย่างในห้องนอนห้องนั่งเล่นหรือแม้แต่ห้องรับประทานอาหารคุณสามารถทำสิ่งเหล่านี้ได้อย่างรวดเร็วและไม่จำเป็นต้องเย็บผ้า พวกเขามีราคาเพียงประมาณ 7 เหรียญต่อแผงซึ่งถูกกว่าผ้าม่านที่ซื้อจากร้านมากและมีเอกลักษณ์เฉพาะมากกว่า หากคุณต้องการคุณสามารถตกแต่งด้วยของที่แตกต่างกันเล็กน้อยหรือให้มันดูดีโดยไม่ต้องมีอะไรเพิ่ม
คำแนะนำ DIY - Fourgenerationsoneroof
กระดานดำเลื่อนแบบชนบทพร้อมการสนับสนุนพื้นที่
นี่คือเครื่องปั้นดินเผา Barn เครื่องปั้นดินเผาที่ยอดเยี่ยมที่เหมาะสำหรับการจัดระเบียบข้อความในครอบครัว มีกระดานดำสำหรับเขียนข้อความเช่นเดียวกับพื้นที่สำหรับปักหมุดบันทึกสูตรอาหารหรือสิ่งอื่น ๆ ที่คุณต้องการเพื่อให้สะดวก ชิ้นงานดั้งเดิมจาก Pottery Barn (ซึ่งไม่มีจำหน่ายแล้ว) มีราคาเกิน 100 เหรียญ แต่คุณสามารถทำเองได้ในราคาประมาณ 10 เหรียญขึ้นอยู่กับสิ่งที่คุณมีอยู่ในมือสำหรับโครงการ
คำแนะนำ DIY - Prettyhandygirl
ถุงน่องคริสต์มาส Burlap
เราทราบดีว่าโปรเจ็กต์คริสต์มาสยังเร็วไปหน่อย แต่โปรเจ็กต์นี้น่ารักมากจนต้องพูดถึง หากคุณต้องการตกแต่งในรูปลักษณ์ที่เรียบง่ายในวันหยุดที่จะมาถึงนี้ถุงน่องผ้าใบเหล่านี้เหมาะอย่างยิ่ง เพียงแค่วัดตัดเย็บแล้วตกแต่งด้วยสิ่งที่คุณต้องการ เสื้อครุยที่ไม่มีการปิดกั้นเหล่านี้เป็นสิ่งที่น่ารักและทำให้พวกเขาดูเป็นชนบทจริงๆ คุณสามารถทำสิ่งเหล่านี้ได้มากเท่าที่คุณต้องการสำหรับหิ้งของคุณหรือจินตนาการว่าเพิ่มเข้าไปในการตกแต่งระเบียงของคุณ
คำแนะนำ DIY - Dearlillieblog
กระโปรงเตียงเร้าใจ
กระโปรงเตียงที่ยอดเยี่ยมนี้มี ruffles มากมายและเหมาะอย่างยิ่งในพื้นที่สำหรับผู้ที่ต้องการเพิ่มความรู้สึกเรียบง่ายให้กับบ้านของคุณ กระโปรงนั้นทำง่ายกว่าที่คิดจริงๆและคุณสามารถสร้างเป็นขนาดคิงไซส์หรือควีนไซส์ได้ตามคำแนะนำ คุณสามารถตัดมันลงได้หากต้องการกระโปรงเตียงขนาดเต็มหรือเตียงคู่ คันธนูเล็ก ๆ ที่มุมนั้นน่ารักจริงๆและลองนึกดูว่ามันจะดูเป็นอย่างไรเมื่อใช้หมอนตกแต่งผ้าใบสักใบบนเตียง
มีจำหน่ายที่: กระโปรงเตียง Etsy Ruffled
เมนูอาหารเย็นที่ลบได้
เมนูนี้จะแต่งห้องครัวของคุณอย่างแน่นอนและมีฟังก์ชั่นเล็ก ๆ น้อย ๆ ที่มีประโยชน์ คุณสามารถติดตามอาหารทั้งหมดที่คุณวางแผนจะทำในแต่ละสัปดาห์ได้ สิ่งนี้ช่วยให้คุณรู้ว่าคุณมีทุกสิ่งที่ต้องการในมือและจัดเตรียมอาหารมื้อเย็นทั้งหมดของคุณได้อย่างสมบูรณ์แบบ ตัวโครงการนั้นง่ายมากและคุณสามารถใช้โทนสีใดก็ได้ที่คุณต้องการเพื่อให้คุณสามารถจับคู่กับการตกแต่งห้องครัวของคุณได้อย่างสมบูรณ์แบบ สิ่งเหล่านี้จะเป็นของขวัญที่ยอดเยี่ยมเช่นกัน
คำแนะนำ DIY - Bystephanielynn
Pottery Barn Inspired Frenchy Pillow
หมอนลายโมโนแกรมอันงดงามนี้เหมาะสำหรับห้องนอนทุกห้องและมาพร้อมกับช่อดอกไม้แสนน่ารัก หากคุณมีผ้าใบและของเติมอยู่แล้วสิ่งนี้จะไม่เสียค่าใช้จ่ายใด ๆ เลยซึ่งถูกกว่ารุ่น Pottery Barn ที่สามารถใช้งานได้เกือบ 50 เหรียญด้วยชื่อย่อ คุณสามารถทำสิ่งเหล่านี้ในเวอร์ชันที่เล็กกว่าได้เช่นกันเพื่อแต่งเตียงหรือแม้แต่โซฟาหากคุณต้องการและใช้เวลาเพียงเล็กน้อยในการทำให้เสร็จ
คำแนะนำ DIY - Confessionsofaplateaddict
ม่านอาบน้ำผ้าใบ
คุณสามารถสร้างทั้งม่านอาบน้ำผ้าใบและไม้แขวนเสื้อที่น่ารักเพื่อให้เข้ากันได้โดยไม่ต้องเย็บตะเข็บ โครงการเล็ก ๆ นี้ใช้กาวผ้าและเตารีดเพื่อให้ทุกอย่างเข้าที่ ราวแขวนผ้าระหว่างตะขอม่านเป็นสัมผัสที่ดีและทำให้ห้องน้ำทั้งหมดดูเรียบง่ายและล้าสมัยจริงๆ นี่เป็นรูปลักษณ์ที่ยอดเยี่ยมสำหรับห้องน้ำใด ๆ และคุณต้องใช้พื้นที่ประมาณ 5 หลาเพื่อทำสิ่งทั้งหมดให้เสร็จดังนั้นจึงเป็นเรื่องง่ายและราคาไม่แพงจริงๆโดยเฉพาะอย่างยิ่งถ้าคุณมีพื้นที่อยู่แล้วไม่กี่หลา
คำแนะนำ DIY - การทำขนมครึ่งหน้า
Anthropologie แรงบันดาลใจจาก Jute Hurricane Lantern
คุณสามารถสร้างโคมไฟพายุเฮอริเคน Anthropologie ที่ยอดเยี่ยมนี้ได้ด้วยผ้าผืนเล็ก ๆ เส้นใหญ่ในสวนและเชือกปอและอุปกรณ์อื่น ๆ อีกสองสามอย่าง คุณจะต้องใช้ภาชนะเพื่อสร้างแบบฟอร์ม แต่คุณสามารถรีไซเคิลแกลลอนชาเย็นเก่า ๆ ได้ดังนั้นหากคุณมีอุปกรณ์อื่น ๆ อยู่ในมืออันนี้จะไม่เสียค่าใช้จ่ายใด ๆ เหมาะสำหรับตกแต่งนอกบ้านและทำง่ายมาก คุณสามารถทำหลายอย่างและสร้างความบันเทิงบนดาดฟ้าได้อย่างมีสไตล์ในฤดูร้อนนี้
คำแนะนำ DIY - เพลงสวด
พวงหรีดผ้าใบ
คุณสามารถสร้างพวงหรีดพื้นที่น่ารักนี้และทำการตกแต่งที่แตกต่างกันเพื่อให้คุณสามารถแขวนไว้ได้ตลอดทั้งปีและเปลี่ยนมันเล็กน้อยเพื่อให้เข้ากับแต่ละฤดูกาล พวงหรีดใช้เวลาน้อยมากในการสร้างและคุณต้องการวัสดุน้อยมาก คุณเพียงแค่ใช้วัสดุผ้าใบกับรูปแบบพวงหรีดของคุณหรือคุณสามารถทำจากลวดก็ได้หากต้องการจากนั้นเพิ่มการตกแต่งที่คุณต้องการ ต้องใช้พื้นที่หลายหลาขึ้นอยู่กับว่าคุณต้องการให้พวงหรีดเต็มขนาดไหนและคุณสามารถเพิ่มตัวอักษรไม้หรือเครื่องประดับอื่น ๆ โดยใช้ลวดดอกไม้
คำแนะนำ DIY - Theturquoisehome
ชาวไร่ผ้าผืน
ชาวสวนตัวน้อยเหล่านี้ทำง่ายและเป็นวิธีที่สมบูรณ์แบบในการแสดงดอกไม้ฤดูใบไม้ผลิที่น่ารักของคุณ หลังจากที่คุณปลูกดอกไม้ของคุณในซับใยโกโก้แล้วคุณก็เพียงแค่“ ห่อ” ทั้งหมดลงในผ้าใบแล้วเพิ่มริบบิ้นหรือโบว์ คุณสามารถนั่งบนพื้นได้โดยตรงหรือวางไว้ที่ระเบียงก็ได้หากคุณต้องการบางสิ่งบางอย่างที่จะแต่งเติมความน่าดึงดูดใจของคุณสักหน่อย พวกเขาทำได้ง่ายและดูสวยงามเมื่อคุณรวมหลาย ๆ อย่างเข้าด้วยกัน
คำแนะนำ DIY - Themotherhuddle
No-Sew Burlap Valance
ความสง่างามนี้ดูแพงและสง่างามจริงๆ แต่คุณสามารถสร้างมันได้ในเวลาประมาณหนึ่งชั่วโมงและมีค่าใช้จ่ายน้อยมากในการสร้าง โดยพื้นฐานแล้วคุณต้องวัดหน้าต่างตัดพื้นที่แล้วแขวนไว้ที่หน้าต่าง คุณสามารถใช้เป๊กเพื่อยึดให้เข้าที่และพื้นที่จะซ่อนแท็กอย่างสมบูรณ์แบบไม่ให้มองเห็นได้ ขอบที่หลุดลุ่ยดูดีที่ด้านล่างและคุณเพียงแค่ต้องวางความสัมพันธ์บางอย่างทุกที่ที่คุณต้องการให้มันเพิ่มความโดดเด่นตามที่คุณต้องการ
คำแนะนำ DIY - 11magnolialane
กระดานข่าวพื้นที่
กระดานข่าวพื้นที่อันยอดเยี่ยมนี้สร้างได้ง่ายมากและราคาไม่แพงจริงๆ คุณเพียงแค่ต้องการไม้ก๊อกซึ่งคุณสามารถไปรับได้ที่ Dollar Store ในพื้นที่ของคุณในราคาเพียงเล็กน้อยปืนหลักตะปูหุ้มเบาะสองสามใบและพื้นที่สนาม คุณเพียงแค่คลุมกระดานไม้ก๊อกธรรมดาด้วยผ้าใบจากนั้นใช้ตะปูหุ้มเบาะเพื่อตกแต่งเล็กน้อย เหมาะสำหรับห้องครัวและใช้เวลาในการประกอบกันน้อยมาก เก็บสูตรอาหารตั๋วเงินหรืออะไรก็ได้ที่คุณต้องการไว้ที่นี่และเตือนตัวเองถึงงานสำคัญอย่างมีสไตล์
คำแนะนำ DIY - Tidymom
กระต่ายสีขาว
ไม่ว่าคุณกำลังมองหาโครงการที่ไม่เหมือนใครสำหรับเทศกาลอีสเตอร์หรือคุณแค่ชื่นชอบกระต่ายจริงๆคุณจะต้องหลงรักโครงการกระต่ายแสนง่ายนี้ โปรดทราบว่าคุณไม่จำเป็นต้องทำสีขาว หากคุณชอบพื้นที่สีธรรมชาติ (หรือสีอื่น ๆ สำหรับเรื่องนั้น) คุณสามารถใช้สีอะไรก็ได้ที่คุณต้องการ คุณต้องตัดแบบฟอร์มกระต่ายออกจากพื้นที่เย็บมือและอย่าลืมกรอกข้อมูลก่อนที่จะปิด สิ่งเหล่านี้เหมาะสำหรับกระเช้าอีสเตอร์แบบโฮมเมดหรือที่ใดก็ได้ที่คุณต้องการการตกแต่งที่แปลกและน่ารักจริงๆ
คำแนะนำ DIY - Cottageatthecrossroads
Anthropologie Inspired Ruffled Lampshade
คุณต้องใช้พื้นที่ประมาณหนึ่งหลาครึ่งเพื่อสร้างโป๊ะที่สวยงามนี้ซึ่งจะดูสมบูรณ์แบบในทุกห้องในบ้านของคุณ คุณสามารถใช้ฐานโคมไฟเก่าที่คุณมีอยู่แล้วหรือเลือกซื้อหนึ่งหรือสองชิ้นที่ร้านขายของมือสองในพื้นที่ของคุณหรือขายหลา จากนั้นเพียงแค่ทาสีฐานตามสีที่คุณต้องการและเริ่มทำงานกับเฉดสีที่ได้รับแรงบันดาลใจจาก Anthropologie ของคุณ คุณไม่จำเป็นต้องเย็บอันนี้ คุณสามารถใช้กาวติดผ้าเพื่อให้มัดติดกันทำให้ง่ายต่อการสร้างเพราะมันสวยงาม
คำแนะนำ DIY - Tatertotsandjello
ฟักทองกระสอบ
อย่ารอจนกว่าจะถึงฤดูใบไม้ร่วงเพื่อเริ่มสร้างฟักทองกระสอบเล็ก ๆ ที่น่ารักเหล่านี้ซึ่งคุณสามารถทำได้ในขนาดที่แตกต่างกัน เหมาะอย่างยิ่งสำหรับการตกแต่งภายในหรือภายนอก มีการตัดเย็บเล็กน้อยที่เกี่ยวข้องในการทำ แต่ง่ายกว่าที่ดูมากและคุณสามารถใช้สีต่างๆได้หากต้องการสร้างจอแสดงผลที่มีสีสันและโดดเด่น คุณยังสามารถตกแต่งพื้นที่เล็กน้อยด้วยของแหลมคมหรือเครื่องหมายอื่น ๆ ก่อนที่จะทำให้เป็นฟักทองเพื่อสร้างการแสดงผลที่ไม่เหมือนใคร
คำแนะนำ DIY - รีเฟรช - ต่ออายุ
ผู้ถือภาชนะพื้นที่
ที่ใส่ช้อนส้อมเล็ก ๆ เหล่านี้เป็นสิ่งที่สมบูรณ์แบบในการแต่งโต๊ะอาหารค่ำวันขอบคุณพระเจ้าของคุณ แน่นอนว่าหากคุณไม่ต้องการรอจนกว่าจะถึงวันขอบคุณพระเจ้าที่จะได้ใช้มันก็เหมาะสำหรับการพบปะสังสรรค์ในช่วงฤดูร้อน ทำง่ายมากและไม่ต้องเย็บอะไรเลย คุณสามารถใช้ปืนกาวร้อนจากนั้นเพิ่มเครื่องประดับหรือป้ายชื่อหรืออะไรก็ได้ที่คุณต้องการตกแต่ง เกลียวเส้นเล็ก ๆ เหมาะสำหรับใส่ชื่อหรือข้อความพิเศษที่คุณต้องการแบ่งปันกับแขกที่มาร่วมงานเลี้ยงอาหารค่ำ
คำแนะนำ DIY - Iheartnaptime
แจกันห่อผ้าใบ
เพียงแค่เศษผ้าแจกันแก้วธรรมดาและลูกไม้เล็ก ๆ น้อย ๆ ก็จะช่วยให้คุณสร้างแจกันที่ห่อด้วยผ้ากระสอบที่สวยงามเหล่านี้ซึ่งเหมาะสำหรับงานแต่งงานหรือที่ใดก็ได้ในบ้าน คุณสามารถฉลุภาพหรือคำลงบนแจกันได้อย่างง่ายดายด้วยสีขาวแล้วใช้ลูกไม้สีขาวมัดเข้าด้วยกัน คุณสามารถคลุมแจกันและรีไซเคิลขวดไวน์หรืออะไรก็ได้ที่คุณต้องการเปลี่ยนเป็นแจกันด้วยโครงการนี้ ทำได้ง่ายและรวดเร็วและเสียค่าใช้จ่ายเพียงเล็กน้อย - ไม่มีอะไรเลยหากคุณมีพื้นที่เล็ก ๆ น้อย ๆ และอุปกรณ์อื่น ๆ อยู่ในมือ
คำแนะนำ DIY - เพื่อเสน่ห์
ธง DIY Burlap
ธงนี้เป็นโครงการที่ยอดเยี่ยมหากคุณต้องการสิ่งที่ไม่เหมือนใครแขวนไว้ในบ้านของคุณหรือคุณอาจใช้เป็นธงกลางแจ้งก็ได้เช่นกัน คุณต้องตัดพื้นที่ให้มีขนาดที่คุณต้องการเพิ่มข้อความหรือภาพที่คุณต้องการด้วยลายฉลุแล้วเพิ่มเชือกปอเพื่อแขวนธง โปรเจ็กต์ทั้งหมดนี้จะใช้เวลาน้อยกว่าหนึ่งชั่วโมง (ขึ้นอยู่กับว่าคุณต้องการใช้ข้อความใดและคุณใช้คำอย่างไร) และจะไม่มีค่าใช้จ่ายใด ๆ หากคุณมีพื้นที่ว่างและสีบางส่วนที่มีประโยชน์
คำแนะนำ DIY - Thewoodgraincottage
ผ้าห่อคัพเค้กผ้าใบ
คัพเค้กที่เรียงรายเป็นพื้นที่เป็นไอเดียที่ดีสำหรับงานแต่งงานหรือทุกเวลาที่คุณต้องการเพิ่มสิ่งพิเศษเล็กน้อยให้กับคัพเค้กแสนอร่อยของคุณ หากคุณกำลังวางแผนจัดงานแต่งงานในธีมพื้นที่สิ่งเหล่านี้จะดูดีถัดจากเค้กแต่งงานของคุณ คุณเพียงแค่ต้องกาวผ้าใบลงบนแม่แบบกระดาษห่อคัพเค้กจากนั้นนั่งคัพเค้กลงไป คุณสามารถเพิ่มการตกแต่งแบบใดก็ได้ที่คุณต้องการแม้ว่าการผูกปอแบบเรียบง่ายหรือเส้นใหญ่จะดูดีผ่านตรงกลาง
ผู้ถือเทียนพื้นที่
เชิงเทียนเล็ก ๆ เหล่านี้จะเหมาะสำหรับการตกแต่งในฤดูใบไม้ร่วง แต่ก็จะดูดีในช่วงฤดูอื่น ๆ เช่นกัน คุณต้องตัดพื้นที่เพื่อปิดเชิงเทียนแก้ว (หรือภาชนะแก้วสำหรับเรื่องนั้น ๆ ) แล้วตกแต่งตามที่คุณต้องการ ลูกโอ๊กดูดีมากตรงกลางด้านหน้า แต่คุณสามารถใช้จินตนาการในการตกแต่งได้ คุณเพียงแค่พันผ้ารอบขวดกาวให้เข้าที่แล้วเพิ่มริบบิ้นเส้นใหญ่ที่ด้านหน้าเพื่อให้ดูดีมาก
คำแนะนำ DIY - Victoriabrikho
ที่รองแก้ว
ที่รองแก้วเหมาะสำหรับทั้งภายในและภายนอก คุณสามารถใช้สิ่งเหล่านี้เพื่อแต่งปาร์ตี้มื้อค่ำกลางแจ้งในฤดูร้อนหรือเก็บไว้ข้างในเพื่อป้องกันไม่ให้ของเหลวซึมลงบนพื้นผิวไม้ ส่วนที่ดีก็คือมันง่ายมากที่จะทำ หากคุณมีผ้าผืนเล็ก ๆ อยู่ในมือสิ่งเหล่านี้จะไม่ทำให้คุณเสียค่าใช้จ่ายใด ๆ เลย คุณจะต้องมีช่องสี่เหลี่ยมจากวัสดุบางประเภทเพื่อสร้างพื้นฐานสำหรับที่รองแก้วจากนั้นคุณก็เพิ่มผ้าใบและตกแต่งตามที่คุณต้องการ การวาดภาพทำได้ดีและคุณสามารถวาดลงบนพื้นที่ได้โดยตรง
คำแนะนำ DIY - Alyssaandcarla
ต่างหูแสดง
จอแสดงผลต่างหูที่ยอดเยี่ยมนี้ทำจากผ้าใบและตั้งอยู่ในกรอบรูป มันง่ายมากที่จะทำและคุณสามารถเลือกกรอบรูปได้ในราคาอันละประมาณดอลลาร์ดังนั้นจึงมีราคาไม่แพงมาก คุณเพียงแค่เย็บผ้าใบเข้ากับวัสดุปูรองของเฟรมจากนั้นทาสีเฟรมตามที่คุณต้องการ ต่างหูที่มีตะขอเกี่ยวจะหลุดเข้าไปในกระเป๋าและคุณสามารถใส่ต่างหูประเภทอื่น ๆ ได้ที่นี่เช่นกัน ใช้เวลาในการปรับแต่งเล็กน้อยและนี่จะเป็นของขวัญที่ยอดเยี่ยมสำหรับคนที่มีต่างหูมากกว่าที่พวกเขารู้ว่าจะทำอย่างไร
คำแนะนำ DIY - Cucicucicoo
เก้าอี้ห้องครัวมีหลังคา
ยกเก้าอี้ครัวเก่าให้ดูดีด้วยการคลุมด้วยผ้าใบ แม้ว่าคุณจะไม่มีประสบการณ์ในการทำโครงร่างซ้ำมากนัก แต่นี่เป็นโครงการที่ค่อนข้างง่าย คุณเพียงแค่ตัดผ้าใบออกแล้วติดเข้ากับพื้นที่นั่งเล่นคลุมผ้าเก่าหรือคุณสามารถถอดชิ้นส่วนเก่าออกก่อน หากต้องการคุณยังสามารถเพิ่มเบาะเพิ่มอีกเล็กน้อยเพื่อให้เก้าอี้สบายขึ้นมาก นี่เป็นโครงการสุดสัปดาห์ที่ยอดเยี่ยมโดยเฉพาะอย่างยิ่งหากคุณต้องการกู้คืนเก้าอี้ในครัวทั้งหมดของคุณในพื้นที่ สำหรับเก้าอี้เพียงตัวเดียวไม่ควรใช้เวลาเกินสองสามชั่วโมง
คำแนะนำ DIY - Boyohboyohboycrafts
Pocketed Burlap Corkboard
ไม่ว่าคุณจะมีไม้ก๊อกเก่าที่ต้องการปกปิดหรือต้องการไปรับที่ร้าน Dollar Store ของคุณ (ราคาประมาณเหรียญละบาท) นี่เป็นโครงการที่ยอดเยี่ยมที่ช่วยเพิ่มประสิทธิภาพให้กับกระดานบันทึกธรรมดา ผ้าใบถูกพับในบางพื้นที่ดังนั้นจึงสามารถเก็บภาพถ่ายหรือตัวอักษรได้อย่างสมบูรณ์แบบไม่ว่าคุณจะใส่อะไรก็ตาม คุณสามารถใช้เป๊กเพื่อถือสิ่งของต่างๆได้เช่นกันดังนั้นมันจึงช่วยให้คุณจัดระเบียบได้ดีและกระเป๋าเล็ก ๆ ก็สะดวกมากสำหรับผู้ที่เดินทาง
คำแนะนำ DIY - การออกแบบที่ผิดปกติ
ไม่มีซองเย็บผ้า
ซองเหมาะสำหรับใส่ในลิ้นชักโต๊ะเครื่องแป้งและทำให้เสื้อผ้าของคุณมีกลิ่นหอม ซองผ้าใบเล็ก ๆ เหล่านี้เต็มไปด้วยลาเวนเดอร์สดและไม่ต้องใช้การเย็บใด ๆ เลย เหมาะสำหรับลิ้นชักหรือตู้เสื้อผ้าหรือคุณสามารถทำขึ้นและมอบเป็นของขวัญได้ คุณเพียงแค่ทำกระเป๋าจากผ้าใบใส่ลาเวนเดอร์ของคุณแล้วติดกาวหรือมัดเข้าด้วยกัน คุณสามารถตกแต่งเล็กน้อยหากต้องการหรือทิ้งลาเวนเดอร์ไว้ด้านนอก
คำแนะนำ DIY - Onsuttonplace
ผ้าปูโต๊ะ Ruffled Burlap
ผ้าปูโต๊ะที่สวยงามนี้ใช้พื้นที่ประมาณ 12 หลาและผ้ามัสลินไม่กี่หลาสำหรับด้านล่าง มี ruffles น่ารักที่เหมาะสำหรับดินเนอร์โรแมนติกหรือจะดูสวยงามบนโต๊ะอาหารของคุณตลอดเวลา คุณสามารถเพิ่มลูกไม้หรือวัสดุตกแต่งอื่น ๆ ได้เช่นกันหากคุณต้องการ แต่มันก็ดูดีในแบบที่เป็นอยู่จริงๆ คุณต้องเย็บนิดหน่อย แต่จะดูดีแค่ไหนบนโต๊ะอาหารกลางแจ้งของคุณ? หรือจะใช้สำหรับวันหยุดก็ได้เช่นกัน
คำแนะนำ DIY - การเฉลิมฉลองในชีวิตประจำวัน
Burlap Bunny Bag
กระเป๋าหิ้วใบเล็กน่ารักที่มีกระต่ายสีม่วง (หรือจะทำสีอะไรก็ได้) จะดูดีในเทศกาลอีสเตอร์นี้ คุณสามารถใช้สิ่งนี้สำหรับการล่าไข่อีสเตอร์หรือถือเป็นกระเป๋าเงินก็ได้หากต้องการ เป็นกระเป๋าที่ค่อนข้างง่ายที่จะทำและคุณยังสามารถเพิ่มหางฝ้ายเล็ก ๆ น่ารักให้กับกระต่ายของคุณเพื่อให้มันดูน่ารักได้อีกด้วย โครงการนี้เรียกร้องให้มีกระเป๋าผ้าใบที่ทำขึ้นแล้ว แต่คุณสามารถทำด้วยตัวเองได้อย่างง่ายดายและยังทำด้วยผ้ากระสอบหลากสีเพื่อมอบเป็นของขวัญ
คำแนะนำ DIY - Thecasualcraftlete
แบนเนอร์พื้นที่
ตกแต่งฤดูใบไม้ร่วงนี้ (หรือฤดูใบไม้ผลิฤดูร้อนหรือฤดูหนาว) ด้วยแบนเนอร์พื้นที่น่ารักที่คุณสามารถทำเองได้ง่ายๆ คุณต้องตัดชิ้นส่วนสำหรับแบนเนอร์ลายฉลุในสิ่งที่คุณต้องการจะพูดจากนั้นกาวปอหรือเกลียวกับแต่ละชิ้นเพื่อยึดเข้าด้วยกันและแขวนไว้ นี่จะดีมากสำหรับแบนเนอร์คริสต์มาสหรือวันขอบคุณพระเจ้าหรือคุณสามารถเปลี่ยนเป็นแบนเนอร์อีสเตอร์ที่มีกระต่ายหรืออะไรก็ได้ที่คุณต้องการเพิ่ม
คำแนะนำ DIY - Iheartnaptime
พรมผ้าใบกลางแจ้งง่าย
สร้างพรมกลางแจ้งที่ดีจริงๆสำหรับช่วงฤดูร้อนของคุณให้สนุกสนานด้วยผ้าใบสีอะครีลิคลายฉลุและยาอะคริลิกบางส่วน การอุดรูรั่วช่วยไม่ให้ขอบของผ้าใบคลี่ออกและช่วยให้ร่างกายสัมผัสกับพรม คุณสามารถออกแบบตามที่คุณต้องการและคุณสามารถเลือกพื้นที่ในสีต่างๆได้หากธรรมชาติไม่เข้ากับการตกแต่งกลางแจ้งของคุณ นี่คือพรมที่สวยงามและใช้เวลาในการทำน้อยมาก เพิ่มลงในดาดฟ้าหรือชานบ้านของคุณและทำให้การตกแต่งกลางแจ้งของคุณมีชีวิตชีวา
คำแนะนำ DIY - Apartmenttherapy
ผ้าม่านกระสอบกาแฟ
คุณสามารถหาถุงกาแฟเก่า ๆ ที่ทำจากผ้ากระสอบได้อย่างง่ายดายบนอินเทอร์เน็ตและเมื่อคุณมีคู่แล้วคุณสามารถสร้างมูลค่าถุงกาแฟที่น่ารักเหล่านี้สำหรับห้องครัวได้ ส่วนสำคัญของโครงการเป็นเรื่องง่ายมาก คุณต้องวัดหน้าต่างของคุณเพื่อให้แน่ใจว่าพื้นที่ของคุณมีขนาดที่เหมาะสมจากนั้นสร้างไม้แขวนเพื่อร้อยเชือกขึ้นบนราวม่าน คุณไม่จำเป็นต้องเย็บ คุณสามารถใช้กาวติดผ้าได้หากต้องการและสามารถติดแหวนด้วยคลิปได้
คำแนะนำ DIY - Debbie-debbiedoos
ชนบทออตโตมัน
หากคุณมีออตโตมันตัวเก่าที่คุณต้องการตกแต่งใหม่ทำไมไม่ทำในผ้าใบ? นี่เป็นรูปลักษณ์ที่ยอดเยี่ยมที่เข้ากับการตกแต่งห้องนั่งเล่นแทบทุกรูปแบบและทำได้ง่ายกว่าที่คุณคิด คุณต้องเอาผ้าออกจากออตโตมันแล้วแทนที่ด้วยผ้าพันผืนพอที่จะคลุมและมีส่วนเสริมเล็กน้อยที่จะยึดลงที่ด้านข้าง หากคุณไม่มีออตโตมันเก่าคุณอาจหาซื้อได้ในราคาถูกที่ลานขายหรือร้านขายของมือสองในพื้นที่ของคุณ
คำแนะนำ DIY - Lizmarieblog 
ป้ายซักผ้าพื้นที่
ป้ายผ้าใบนี้จะดูดีในห้องซักผ้าและง่ายมากที่จะทำให้เสร็จภายในเวลาไม่ถึงหนึ่งวัน คุณจะต้องมีกรอบสำหรับแขวนและคุณจะต้องพิมพ์ผ้าตัวเล็กน่ารักที่พูดลงบนผ้าใบของคุณโดยตรง เชื่อหรือไม่ว่าการพิมพ์บนผ้าใบนั้นง่ายมากและคุณสามารถทำได้ด้วยเครื่องพิมพ์ธรรมดา เมื่อคุณได้เรียนรู้เคล็ดลับเล็ก ๆ น้อย ๆ ที่มีประโยชน์แล้วคุณจะต้องพิมพ์สิ่งต่างๆลงในผ้าใบ เมื่อคุณพิมพ์เสร็จแล้วให้ใส่กรอบคำพูดและแขวนไว้ในห้องซักผ้าของคุณ
คำแนะนำ DIY - พูดในประเทศ
ต้นไม้ริบบิ้นผ้าใบ
ไม่ว่าคุณจะตกแต่งในเทศกาลคริสต์มาสหรือเพียงแค่ต้องการสิ่งที่ไม่เหมือนใครจริงๆเพื่อประดับโต๊ะกาแฟต้นริบบิ้นผ้าใบเหล่านี้ก็สมบูรณ์แบบและทำได้ง่ายอย่างสมบูรณ์แบบ คุณสามารถใช้กรวยโฟมหรือทำกรวยจากแผ่นโปสเตอร์แล้วพันผ้าพันรอบ ๆ คุณสามารถทำสิ่งเหล่านี้ด้วยสีที่แตกต่างกันสำหรับฤดูใบไม้ผลิและฤดูร้อนหรือใช้สีเขียวและสีแดงแบบคลาสสิกสำหรับวันหยุดก็ได้ทุกอย่างที่คุณต้องการ ริบบิ้นผ้าใบแบบมีสายใช้งานได้ดีและยึดเข้าที่ได้ดี นอกจากนี้คุณยังมีสีให้เลือกมากมาย
คำแนะนำ DIY - Thegirlcreative
นางฟ้าคริสต์มาสที่สวยงาม
ตอนนี้เป็นเวลาที่จะเริ่มต้นการตกแต่งที่เป็นเอกลักษณ์สำหรับคริสต์มาสและนางฟ้าบนผืนผ้าใบนี้เป็นสิ่งที่ต้องทำถ้าคุณชอบรูปลักษณ์แบบชนบท สิ่งเหล่านี้จะทำให้เป็นของขวัญที่ยอดเยี่ยมและทำได้ง่ายมาก ริบบิ้นผ้าใบแบบมีสายใช้สำหรับปีกและมีอุปกรณ์อื่น ๆ อีกสองสามอย่างที่คุณต้องการเช่นกัน มีราคาไม่แพงมากในการทำและคุณสามารถตกแต่งได้หลายวิธีเพื่อให้คุณสามารถสร้างสไตล์ต่างๆที่ไม่เหมือนใครได้อย่างสมบูรณ์
คำแนะนำ DIY - การออกแบบที่ผิดปกติ
แหวนผ้าเช็ดปาก Beaded Burlap
แหวนผ้าเช็ดปากเหล่านี้มีความหรูหราและเหมาะสำหรับงานเลี้ยงอาหารค่ำงานแต่งงานหรืองานแต่งงานที่โรแมนติกหรือทุกเวลาที่คุณต้องการสิ่งที่พิเศษเล็กน้อย มีสองวิธีที่แตกต่างกันที่คุณสามารถทำแหวนผ้าเช็ดปากด้วยผ้าพันพื้นที่และทั้งหมดนี้ค่อนข้างง่าย หากคุณชอบรูปลักษณ์ของลูกปัดคุณสามารถตัดผ้าม่านเพิ่มลูกปัดแล้วเย็บปลายเข้าด้วยกันเพื่อสร้างแหวน การเย็บอาจจะใช้งานได้ดีกว่ากาวผ้าสำหรับอันนี้ แต่คุณสามารถเย็บด้วยมือได้โดยไม่ต้องใช้เครื่องจักร
คำแนะนำ DIY - Fabyoubliss
เครื่องประดับพื้นที่ประเทศ
เด็ก ๆ จะชอบช่วยคุณสร้างเครื่องประดับคริสต์มาสในประเทศที่น่ารักเหล่านี้ด้วยผ้าใบ ลองนึกภาพต้นคริสต์มาสของคุณที่ตกแต่งอย่างสมบูรณ์ด้วยการสร้างสรรค์ที่น่ารักเหล่านี้ ง่ายต่อการทำและคุณสามารถหาได้หลายอย่างจากวัสดุผ้าใบไม่กี่หลา ใช้กลิตเตอร์สเตนซิลและเครื่องประดับอื่น ๆ เพื่อตกแต่งเล็กน้อยหรือจะปล่อยให้เรียบๆก็ได้ตามต้องการ ไม่ต้องใช้การตัดเย็บคุณใช้กาวผ้าแทนแล้วใช้เพียงแค่ติดริบบิ้นเส้นใหญ่หรือเชือกอื่น ๆ เพื่อยึดเข้ากับต้นไม้
คำแนะนำ DIY - Ttrinketsinbloom
Burlap Topiary
คุณสามารถสร้างพื้นผิวพื้นที่น่ารักเหล่านี้ได้ในขนาดที่แตกต่างกันทั้งหมดจึงเหมาะสำหรับทั้งในบ้านและนอกบ้าน สร้างคนที่มีขนาดค่อนข้างใหญ่สองสามอันสำหรับยืนนอกประตูหน้าบ้านของคุณหรือคุณอาจทำให้ตัวเล็กลงเพื่อสร้างโต๊ะกลางหรือจอแสดงผลที่สวยงาม คุณสามารถเพิ่มลงในเครื่องปลูกที่มีสีสันสดใสเพื่อใช้ในฤดูใบไม้ผลิหรือใส่เป็นสีขาวเพื่อตกแต่งในช่วงฤดูใบไม้ร่วงและฤดูหนาว เหล่านี้ยอดเยี่ยมมาก พวกเขาทำได้ง่ายและคุณสามารถทำอะไรได้มากมายกับถนนหนทางที่น่ารักในแง่ของการตกแต่ง
คำแนะนำ DIY - Designdininganddiapers
แผ่นรองพื้นที่ลายฉลุ
จัดโต๊ะของคุณให้สวยงามด้วยกระดาษรองจาน DIY ง่ายๆเหล่านี้ คุณเพียงแค่ตัดผ้าใบที่คุณต้องการให้มีขนาดที่เหมาะสมเพิ่มกาวผ้าที่ขอบและเหล็กซึ่งจะช่วยป้องกันไม่ให้หลุดลุ่ยจากนั้นจึงทำการฉลุในสิ่งที่คุณต้องการ คุณสามารถสร้างชื่อสมาชิกแต่ละคนสำหรับดินเนอร์ในครอบครัวหรือสร้างข้อความพิเศษสำหรับวันหยุด สิ่งเหล่านี้ยอดเยี่ยมเพราะใช้เวลาน้อยมากและใช้ผ้าน้อยมากดังนั้นคุณจึงสามารถใช้พื้นที่หลาย ๆ หลาได้ และไม่จำเป็นต้องมีการตัดเย็บจึงง่ายต่อการทำ
คำแนะนำ DIY - คิดถึงบ้าน
แขวนผนังตะกร้าอีสเตอร์
คุณยังมีเวลาเหลือเฟือในการสร้างผนังตะกร้าอีสเตอร์ที่น่ารักนี้แขวนอยู่นอกพื้นที่ คุณสามารถใช้ริบบิ้นผ้าใบแบบมีสายซึ่งง่ายกว่ามากในการงอและบิดและยึดติดกันได้ดีเมื่อสร้างงานฝีมือบางอย่าง เมื่อทำตะกร้าเสร็จแล้วก็ตกแต่งด้วยตุ๊กตาลูกเจี๊ยบกระต่ายหรืออะไรก็ได้ที่คุณต้องการเพิ่ม นี่เป็นโครงการที่น่ารักและง่ายมากจนคุณแทบไม่เชื่อ ใช้สิ่งนี้ในการตกแต่งประตูและคุณสามารถข้ามการตกแต่งในเทศกาลอีสเตอร์และใช้สีฤดูใบไม้ผลิหากคุณต้องการปล่อยให้มันแขวนตลอดฤดูร้อน
คำแนะนำ DIY - Trendytree
Burlap Snowman แขวนผนัง
ในเวลาประมาณหนึ่งชั่วโมงคุณสามารถสร้างที่แขวนผนังมนุษย์หิมะ 3 มิติที่เหมาะสำหรับการตกแต่งคริสต์มาสของคุณหรือคุณอาจจะทำเป็นของขวัญสักสองสามชิ้นก็ได้ คุณเพียงแค่ติดผ้าใบเข้ากับเฟรมจากนั้นจึงทาสีมนุษย์หิมะ ใช้เวลาน้อยมากและถ้าคุณมีพื้นที่ว่างและเฟรมเล็ก ๆ ไม่กี่เฟรมคุณก็ไม่ต้องเสียอะไรไปกับเฟรมนี้ คุณสามารถทำในตัวละครต่างๆได้หากต้องการดังนั้นหากคุณยังไม่พร้อมที่จะเริ่มงานฝีมือคริสต์มาสจริงๆให้ทำตัวละครฤดูร้อนหรือแม้แต่กระต่ายอีสเตอร์
คำแนะนำ DIY - Howtothisandthat
ตะกร้าสานพื้นที่รองชนะเลิศอันดับ
นักวิ่งตารางนี้ดูซับซ้อนมาก แต่เป็นโครงการที่ง่ายมาก คุณจะต้องสามารถสร้างเอฟเฟกต์การสานตะกร้าซึ่งง่ายกว่าที่เห็นมาก ในขณะที่คุณดำเนินการต่ออย่าลืมติดกาวแต่ละชิ้นเพื่อให้เข้าที่อย่างสมบูรณ์แบบ นี่คือนักวิ่งที่ยอดเยี่ยมสำหรับโต๊ะในห้องอาหารหรือคุณสามารถทำให้มันมีขนาดแตกต่างกันสำหรับโต๊ะกาแฟโต๊ะเครื่องแป้งหรือที่ใดก็ได้ที่คุณต้องการ สร้างเวอร์ชันที่เล็กกว่ากำลังสองเพื่อแทนที่ doilies
คำแนะนำ DIY - Taradennis
กรอบรูปพื้นที่
เฟรมผ้าใบที่สวยงามเหล่านี้ทำง่ายมากและคุณไม่จำเป็นต้องใช้ไม้ใด ๆ ในการทำ คุณเพียงแค่ต้องปิดกระดาษแข็งด้วยผ้าใบเพื่อให้ได้กรอบรูปที่น่ารักซึ่งดูเหมือนว่าจะมีค่าใช้จ่าย สิ่งเหล่านี้จะเป็นของขวัญที่ยอดเยี่ยมสำหรับทุกคนที่คุณรู้จักและเป็นเรื่องง่ายมากที่จะทำหลายอย่างในหนึ่งวัน คุณไม่ต้องทำการเย็บใด ๆ คุณจับผ้าใบพร้อมกับกาวผ้าจากนั้นเพิ่มของตกแต่งที่คุณต้องการเพื่อให้มันไม่เหมือนใครจริงๆ
คำแนะนำ DIY - Allthumbscrafts 
ห่อเทียน Yo-Yo ที่รักชาติ
วันที่ 4 กรกฎาคมกำลังจะมาถึงและการห่อเทียนเหล่านี้จะเหมาะสำหรับงานปาร์ตี้กลางแจ้งและการตกแต่ง ผ้าผืนน้อยยอ - ยศตกแต่งห่อเทียนซึ่งทำได้ง่ายจากแถบผ้าพันผืน เพียงแค่เลือกขนาดที่คุณต้องการจากนั้นตัดและใช้กาวผ้าเพื่อให้ห่อเข้าด้วยกัน จากนั้นตกแต่งด้วยผ้า Yo-Yos หรือจะเลือกรูปแบบอื่นก็ได้ตามต้องการ คุณสามารถใช้เชิงเทียนแก้วแบบดั้งเดิมหรือสร้างสรรค์และรีไซเคิลขวดแก้วและไหเก่า ๆ
คำแนะนำ DIY - Thecountrychiccottage
กรอบรูปตัวอักษรแขวนผนัง
Monograms เหมาะอย่างยิ่งสำหรับการตกแต่งบ้านของคุณและอันนี้ทำด้วยไม้และผ้าใบซึ่งทำให้มันไม่เหมือนใครและงดงามจริงๆ คุณจะต้องซื้อตัวอักษรไม้ (หรือตัดออกถ้าคุณมีเครื่องมือที่เหมาะสม) จากนั้นทาสีตามสีที่คุณต้องการ รับกรอบให้เข้ากันหรือใช้ของเก่าแล้วทาสีด้วย การสำรองข้อมูลเป็นพื้นที่และตัวอักษรถูกยกขึ้นจึงมีเอฟเฟกต์ 3 มิติที่ยอดเยี่ยม นี่เป็นเรื่องง่ายมากที่จะทำและจะเป็นของขวัญแต่งงานที่ยอดเยี่ยมหากคุณรู้จักใครสักคนที่กำลังจะแต่งงานในฤดูร้อนนี้
คำแนะนำ DIY - Newideasforyou
กล่องผ้า
เก็บอุปกรณ์งานฝีมือการเย็บผ้าหรือวัสดุถักหรือสิ่งอื่น ๆ ที่คุณต้องการให้เป็นประโยชน์และจัดระเบียบด้วยกล่องผ้าผืนใหญ่ กล่องเหล่านี้ไม่เพียง แต่ดูดี แต่ยังทำง่ายมากอีกด้วย โครงการนี้ต้องใช้การตัดเย็บเล็กน้อย แต่เป็นเรื่องง่ายสำหรับผู้เริ่มต้น คุณจะต้องเลือกผ้าสำหรับด้านในของกล่องและใช้เวลาเพียงไม่กี่ชั่วโมง (อาจจะไม่นานขนาดนั้น) ในการสร้าง เหมาะสำหรับจัดห้องน้ำหรือใช้เป็นที่ใส่นิตยสาร
คำแนะนำ DIY - Ecokaren
ชั้นวางนิตยสารแรงบันดาลใจจากฝรั่งเศส
หากคุณมักจะมีนิตยสารโยนทิ้งไว้ (ในห้องน้ำ) ชั้นวางนิตยสารนี้เป็นสิ่งที่ต้องทำอย่างแน่นอน มันง่ายมากที่จะทำและใช้เวลาไม่ถึงหนึ่งชั่วโมงตั้งแต่ต้นจนจบ พื้นที่ถูกพับขึ้นดังนั้นคุณเพียงแค่ม้วนนิตยสารขึ้นและเลื่อนให้เข้าที่ คุณสามารถตกแต่งสิ่งนี้ได้ตามที่คุณต้องการ แต่มันดูดีมากในการออกแบบสไตล์ฝรั่งเศส เป็นเรื่องง่ายมากที่คุณอาจต้องการสร้างห้องน้ำทุกห้องในบ้านของคุณหรือใช้ในห้องครัวเพื่อเก็บนิตยสารการทำอาหารทั้งหมดของคุณ
คำแนะนำ DIY - Thegraphicsfairy
ไม่เย็บกระโปรงต้นไม้ Ruffled
ไม่เคยเร็วเกินไปที่จะเริ่มงานฝีมือสำหรับเทศกาลคริสต์มาส กระโปรงลายต้นไม้ DIY ที่สวยงามนี้ทำจากผ้ากระสอบและไม่ต้องใช้การเย็บใด ๆ อาจจะใช้เวลานานสักหน่อย แต่ลองนึกดูว่าต้นไม้ของคุณจะดูสวยงามแค่ไหนเมื่อมีกระโปรงใต้กระโปรงนี้ คุณใช้ปืนกาวร้อนเพื่อจับมันทั้งหมดเข้าด้วยกันและมันก็ใช้งานได้ดีอย่างน่าประหลาดใจสำหรับ ruffles ด้วย ตอนนี้คุณสามารถซื้อออนไลน์ได้ในราคาเพียง $ 100 แต่ทำไมคุณถึงทำเช่นนั้นเมื่อคุณสามารถทำเงินได้ประมาณ $ 20 หรือมากกว่านั้น?
คำแนะนำ DIY - Eevanad
พวงหรีดภาพถ่ายพื้นที่
หากคุณกำลังวางแผนที่จะทำพวงหรีดผ้าใบทำไมไม่ปรับแต่งและเพิ่มรูปถ่ายครอบครัวจริงๆ? นี่เป็นไอเดียของขวัญที่สวยงามหากคุณกำลังมองหาสิ่งที่ไม่เหมือนใครสำหรับวันแม่หรือเพียงแค่สร้างขึ้นมาเพื่อตัวคุณเอง ภาพถ่ายถูกผูกด้วยคันธนูในการประสานสีและรูปลักษณ์โดยรวมก็ดูงดงาม คุณเริ่มต้นด้วยรูปแบบพวงหรีดและริบบิ้นผ้าใบแบบมีสายและจากตรงนั้นคุณสามารถปรับแต่งได้ทุกวิธีที่คุณต้องการทำให้เป็นเอกลักษณ์โดยสิ้นเชิง
คำแนะนำ DIY - Thistlewoodfarms
หัวเตียงพื้นที่กระจุก
หากคุณกำลังต้องการทำห้องนอนใหม่หัวเตียงผ้าใบนี้เป็นจุดเริ่มต้นที่สมบูรณ์แบบ Rustic and charming, you can actually make it in whatever size you need for your specific bed. It is really easy and the completed look is lovely. Add some burlap throw pillows and you can completely change how your bedroom looks in less than a day. It doesn’t take nearly as much material or as much time as you may think to create this look and you can embellish with burlap buttons or just anything you want.
DIY Instructions – Thestudiolo
No-Sew Burlap Bow Ties
Imagine your country wedding complete with burlap bow ties. These adorable little ties require absolutely no sewing and they are clip-ons so there are no worries of your guys being able to tie them when they are finished. These take so little time to make and very little fabric for each one so if you are planning a rustic wedding with burlap accessories, a couple of yards will go a long way in making all of the bow ties that you need.
DIY Instructions – Weddingwindow
Stamped Burlap Ornaments
Instead of using the same plain old ornaments this coming Christmas, why not spruce it up a bit by making these adorable stamped burlap ornaments? The project involves putting burlap around foam balls (which by the way are very inexpensive) and then stamping your message across them. You can display any message you want and these would also look great on wreaths or just in a bowl by the front door for added decoration.
DIY Instructions – Blissbloomblog
Stenciled Magnetic Board
Add a little style to those organization areas with an easy to make stenciled magnetic board. The stenciling makes it as elegant or whimsical as you want it to be so you could use it as an art piece which also doubles as a functional magnetic board. Just stencil in whatever pattern you want and if you want, you can add a few embellishments made from burlap like flowers, ribbons or bows. Tie a ribbon or use twine to give it a hanger.
DIY Instructions – Domestically-speaking
Burlap Project Bin
What better place to store all of those crafting supplies than in a great DIY burlap bin? This is a really easy project that won’t even take you a day to complete and once you are finished, you will have a wonderful place to store just about anything. A little burlap, some upholstery tacks and some small wooden bins (think the types that oranges come in) and you’re all set to create an attractive bin that could be used for any number of organization projects.
DIY Instructions – Gardenhouseliving
No-Sew Stenciled Burlap Pillows
Twine bows are used to hold this adorable burlap pillow together so there really is no sewing involved. It’s a great project if you have a couple of hours to spare and the time really depends on how complicated your stenciling is. If you just want a small picture or message, you can finish this up in less than an hour. The twine around the edges is a really nice touch and it gives it a great country feel and all with absolutely no sewing required.
DIY Instructions – Debbie-debbiedoos
Coffee Bag Purse
Forget paying hundreds of dollars for a Dior original. You can make this adorable coffee sack purse yourself for less than $10 – depending on the materials that you have on hand. You will need an old book for the supporting frame and then you just have to sew it all together. It’s actually a lot easier than it looks and you will end up with a bag that very strongly resembles Dior’s coffee bag purse only you’ll have a few hundred dollars left over. If you’re not a fan of the coffee bags, just use plain burlap and maybe a few stencils to get the design that you want.
DIY Instructions – Trinketsinbloom
พวงมาลัยผ้าใบ
To create a lovely burlap garland, you really don’t need anything except the wired burlap ribbon and some string for hanging. You will need something to weave the ribbon in and out of the burlap but you can use a safety pin or bobby pin for that. Then just bunch up the burlap to create a great poufy ruffled look and tie it up. You can use this for Christmas decorating or just have it on the mantel whenever you need a little extra something.
DIY Instructions – Southerndiydiary
Spring Banner Lampshade
A mason jar is the base for this adorable lamp that has a burlap covered lampshade. While you can buy a lampshade in burlap, it is a lot cheaper to just cover an old one yourself. The best part of this little lamp is the spring themed banner than runs along it. Colorful ribbons complete the look. You could also have spare banners in fall colors or in a Christmas theme so that you can change it around whenever the seasons change.
DIY Instructions – Redberrybarn
Burlap Purse with Shabby Rose Decoration
If you want a really easy sewing project and you are in the market for a new purse, this shabby rose purse is a great choice. The rose is made of burlap and in a contrasting color, it really stands out. You can complete this project in a weekend or even in a day if you are quite the seasoned sewer. It would make a wonderful gift for someone who likes things on the unique side or just make it for yourself. It has loads of room on the inside and is much easier to make than it looks.
DIY Instructions – Lamaisonreid
Barrel Shade Chandelier
While you may not be able to make this entire chandelier, you can certainly make the barrel shade that covers on it. The shade is completely covered in burlap which makes it both elegant and rustic at the same time. You may be surprised at how easy it is to create this look, which would be perfect in a foyer or formal dining room. The entire look will cost you less than $15 and take only about an hour or so to complete.
DIY Instructions – Burlapanddenim
Floral Burlap Clutch
This lovely clutch is both simple and inexpensive to make. You can do it in whatever colored burlap you have on hand or whatever you want and then create the flowers in contrasting colors to make them stand out. This is a great bag for evenings out and easy enough for teenagers to make just in case your daughter wants to create something special for prom. The shape and size of an envelope makes it perfect for times when you don’t have a lot to carry with you.
DIY Instructions – Anightowlblog
Patriotic Burlap Flag
Dress up your front door for the Fourth of July with this great patriotic burlap flag that you can make in less than an hour. You will need a bit of burlap and some blue fabric – denim works really well – as well as the cover of a hardback book to create the shape. You just create a flag with your material and then hang it with twine or another similar material. This is actually great for displaying all year and is so very easy to make, not to mention very inexpensive.
DIY Instructions – Somewhatquirkydesign
Vintage Inspired Feedbag Pillows
You don’t actually have to find vintage feedbags to have pillows that resemble them. You can easily make them yourself and dress up your bed in a great rustic way. You will need to paint the lines so that they resemble vintage feedbags and these work great with burlap. Then just sew the ends together, stuff with whatever you prefer in your pillows and seal it all up. You can also use stencils to create whimsical or vintage sayings on the pillows so that they really look authentic.
DIY Instructions – Retropolitanhip
Vintage Wire Basket
This rustic looking basket would make a wonderful hamper in your bathroom or bedroom or you could make a smaller version and use it for magazines or anything else you need. You just line the inside of the vintage wire basket with burlap and then add any decorations or adornments that you want. If you are using it for décor, just add a few burlap pillows to the top and you’re all set. You could also use it for a gift basket and fill with various other burlap type décor.
DIY Instructions – Gailsdecorativetouch
Burlap and Tin Can Vase Garland
A few up-cycled tin cans and some burlap will give you all you need to create this beautiful garland that you can actually plant flowers in. This would look great anywhere that you need to add a little color or greenery. You could use it in the kitchen for growing herbs or hang it on the porch with seasonal flowers in it. Make sure that you clean the tin cans really well and use a can opener that removes the complete top so that there are no sharp edges. Then just cover with burlap and hang with twine.
DIY Instructions – Foxhollowcottage
Burlap Flower Pot
These burlap flower pots are the perfect way to keep your plantings organized this spring. You can use them for flowers or even vegetables or herbs. You just cover a five gallon bucket with burlap, secure it and then label your pots however you want. Hang some twine around the bucket to hold the label in place and your plants will remain perfectly organized so you’ll always know which ones are which, even before they begin growing. This is a great idea for yards that don’t really have garden space.
DIY Instructions – Too-much-time
Burlap Fall Leaf Decorations
In just a few minutes, you can cut out multiple leaves from burlap to create gorgeous fall decorations. You merely have to trace the leaf shapes and then cut them out. If you love using mod podge, you can use that to hold your leaves onto real twigs or anything that you want to decorate for fall. String them all together and create a banner or just have multiple twigs in a glass vase and display your leaves in their natural habitat. This is a great little project that will help you along with other projects.
DIY Instructions – Foxhollowcottage
Burlap Tiki Torches
Save those empty wine bottles this spring and by summer you could have several gorgeous burlap tiki torches lighting up your outdoor living spaces. If you paint the bottles before you begin, you could have very colorful lighting or you could leave them clear – whichever way you prefer. Make a few burlap flowers to decorate them and then simply create the tiki torches which you can use on your outdoor table or affix them to poles and stick them all around your yard. Burn citronella oil in them to get a nice glow that also wards off pesky bugs.
DIY Instructions – Hometalk
Burlap Baker’s Apron
You can make this really great baker’s apron with no sewing whatsoever. You simply have to cut the burlap (you can use a burlap bag to get the writing that you want) and draw in armholes to cut out. Then just cut out the apron form and use a good fabric glue to attach the black seam. This will also keep the burlap from fraying and it looks great as a contrasting background. These would be perfect as gifts for anyone you know who loves to bake or make one for the special Dad in your life for Father’s Day – he can do all of his grilling in style.
DIY Instructions – Gailsdecorativetouch
Reupholstered Burlap Chair
Instead of throwing out that old chair that seems to be falling apart, why not reupholster it in burlap? If you don’t have an old chair to use for this project you can probably pick one up at a flea market or yard sale for really cheap. Reupholstering is much easier than you may think and when you are finished you will have a beautiful chair that looks great in any room. Add a burlap pillow and it will look even better.
DIY Instructions – Beneathmyheart
Burlap Flowered Lampshade
Take that old lamp that is in serious need of a makeover and create this beautiful flowered lampshade. You can use a new lampshade too if you want. Just create the flowers from burlap and then cut a thin strip for the top and bottom to bring it all together. You can glue the flowers and accents on with hot glue and even cover the entire lampshade if you prefer. This would be great done in different colors of burlap to really make the flowers stand out or you could just stick with a neutral color.
DIY Instructions – Laughterandgrace
Burlap Clothespin Bag
If you love drying clothes outside when the weather permits – not only do they smell wonderful but you can save a lot of energy this way – then you’ll definitely want to put together this burlap clothespin bag. It hangs right on the line so your pins are right there where you need them. You can use a burlap coffee bag that’s already put together or use fabric glue. After all, those clothespins really don’t weigh that much.
คำแนะนำ DIY - Apartmenttherapy 
Fringed Burlap Table Runner
Table runners are great for decorating and this fringed burlap runner will be a beautiful addition to your dining room table. You simply have to cut the burlap to fit the length that you need and then go through and fray the edges a bit, tying them off so that they don’t continue to fray in the future. This is a really simple project and tying the frays is actually the most time consuming part. You can easily finish this in a weekend and although there is a little sewing required, there’s not much so even if you are new to sewing, this is a great project for you.
DIY Instructions – Cottageandvine
Burlap Sunglasses Case
Keep those sunglasses safe and clean with a burlap sunglasses case that you can make yourself in just about an hour or so. This project requires a bit of sewing and you will want to choose a fabric to line the case so that your glasses don’t get scratched. You can choose whatever way you want to close the case but button closure on the front of this one works really well and is relatively easy to create. These would make great gifts so if you want something really unique for someone special, make them a burlap glasses case. They are sure to love it as much as you do.
DIY Instructions – Craftingagreenworld
Burlap Chevron Paintings
Chevron is a very popular design these days and if you want to add a bit of this design into your décor, these burlap paintings are a great way to do so. You just have to create the design on your burlap and then frame your finished result. These can be done in any color you want and they are so easy to do. Make them in whatever size you want, use whatever colors you want and you can even toggle the size of the design a bit, too.
DIY Instructions – Glueandglitter
DIY Burlap Canvas
Create a beautiful canvas for your home with burlap, a store bought canvas and whatever design or message you want to display. If you are redoing a specific room in burlap, these canvases are a must. You simply cut the burlap to cover a canvas (or several of them if you want something really large) and then paint on the message that you want to display. This is one of the easiest projects ever and it allows you to be completely creative. You could use stencils or just freehand your message to make it look really rustic and charming.
DIY Instructions – Happytogethercreates
Thanksgiving Place Cards
Ok, so you don’t have to use these only for Thanksgiving but they will look great on your holiday dinner table. These burlap place cards are very easy to make and will take very little time so even if you are planning to have several guests for dinner, you can easily make a place card for each one of them. The center is made from chalkboard paint so they are easily reusable with other guests and you can embellish them with leaves or just anything else that you feel like using.
DIY Instructions – Thecountrychiccottage
Pottery Barn Inspired Burlap Candle
If you love Pottery Barn but just can’t bring yourself to pay some of the prices there, you are going to adore this Pottery Barn knockoff candle made from burlap. You can do these in any size you want. You just have to have a candle on hand that you will cover with burlap. Mod podge holds the burlap in place and once you have the burlap on, you just paint over it with gold paint which gives it that great Pottery Barn look without the cost.
DIY Instructions – Myloveofstyle
Burlap Prints
Printing on burlap is not nearly as difficult as it sounds and once you master that craft you can create these beautiful burlap prints that can be framed or hung on their own. You could make several of these and use them as gifts. Everyone loves burlap and who wouldn’t love their own framed print in burlap? You just choose the message that you want and then print it off directly on your burlap fabric. It’s really easy to do and it allows you to create wonderful prints and gifts that will take you literally only minutes to make.
DIY Instructions – Creativetryals
Burlap Jewelry Box
An old cigar box (a wooden one) and some burlap put together create this adorable jewelry box that will be great for keeping your rings and other jewelry perfectly organized. You will need to cut the burlap so that it just fits the width of the box and then cut it long enough so that you can roll it up and stuff inside the cigar box to hold your rings and other jewelry. If you know someone who loves unique gifts, this would be a great one. You can also paint the box if you want but it looks wonderful in its natural color.
DIY Instructions – Mrkate
Bathroom Subway Art
Subway art has become very popular and what could be better than printing that subway art onto burlap. This bathroom subway art is a beautiful way to decorate the powder room and you can colored stones that you can find at your local craft store to decorate it a bit. Just print the subway art off onto your burlap, frame it and then decorate around it. It’s really simple and something that will take you literally only minutes to put together.
DIY Instructions – Domestically-speaking
Burlap Dry Erase Calendar
Keeping the family organized can be difficult. Most people have a calendar of some sort to help them to keep things together and this burlap calendar is a great choice. You can draw the calendar however you need onto the burlap and then simply frame it in a glass frame. The glass is easily written on and then erased away if you use a dry erase marker. You can be very creative and choose frames of any color and even add a few embellishments if you want. This is a great project for organizing your home and using a bit of that spare burlap as well.
DIY Instructions – Simplykierste
Burlap Storage Bins
Who doesn’t love those handy storage bins? They are after all, perfect for keeping things neatly organized and when you make them from burlap, they are just as decorative as they are functional. You will want to have a few boxes on hand to cover but you can use old diaper boxes or anything that is the size that you need. After all, you will be covering them completely with burlap so it doesn’t really matter what they were in a previous life. Once you finish, you can use these to organize virtually every room in the house. They are easy to make and if you have burlap and boxes, they may not cost you anything, either.
DIY Instructions – Blissfulkeeperathome
Burlap Table Bouquet
If you are planning a burlap wedding, these little table bouquets will be perfect for decorating your reception. If you aren’t currently planning a wedding, you can still make these and just use them to decorate around the house. They are simply folded burlap with ribbon tied around to keep them in place and then filled with lovely flowers. You can use whatever flowers you want or decorate them a bit of you want. You can literally make these in about ten minutes each so if you are planning a wedding, this is a really quick way to get those tables decorated.
DIY Instructions – Propcloset
Burlap Wine Bags
If you love giving wine as gifts, try making these great burlap wine bags to hold that wine. Each bag takes only about half an hour and you can decorate them however you want. Use stencils to put messages on the fronts or even add burlap flowers or bows. These are very easy to make and take very little material so a yard or two of burlap will make several of them. Just tie the top up with ribbon or use twine to really make the bag look rustic.
คำแนะนำ DIY - Michaels
Recycled Patron Vase in Burlap
Patron bottle vases are elegant and adorable and you can really dress them up with a little burlap. Just cover the vase in lace and then cover the center of the lace with burlap or you could do this vice-versa and put the burlap as the backing. These are great for decorating for parties because they are inexpensive and very easy to make so if you need several, they won’t take days to make or cost you a fortune. Add a flower to each one and you’re all set.
DIY Instructions – Diyinspired
Burlap Wedding Invitations
If you are planning a wedding that uses a lot of burlap, why not incorporate the look into your invitations? With some card stock, a printer and a little burlap you can create beautiful invitations that are sure to be a huge hit with family and friends. These are also great for summer parties and other special occasions when you need to send out invitations. You could also use them as wedding programs to let everyone know who is in the wedding and the venue that you will be following.
DIY Instructions – Intimateweddings
Burlap Boutonniere
Whether you are planning a burlap wedding or you have a special someone going to the prom, these burlap boutonnieres are a great choice. You can cut the form out of an empty cereal box so if you already have the burlap and a few other supplies on hand, you won’t have to spend anything to make these. You could add baby’s breath or other flowers to them and actually customize them to perfectly match any wedding theme. And, they’re a lot cheaper than boutonnieres that you purchase from the florist.
DIY Instructions – Greenweddingshoes
Burlap Door Hanger
Whether your family is filled with football fans, baseball enthusiasts or any other sport, you can create a wonderful door hanger that suits your family perfectly. This burlap door hanger is really easy to create and can be completely customized to fit your family’s favorite sport and favorite team. You just have to cut the burlap to match the form that you need (football, baseball, etc.) and then sew it together and stuff. Once you’re done you can decorate with bows or just anything that makes it special.
DIY Instructions – Greatdaygraphics
Burlap Covered Gifts in a Jar
You know how popular gifts in a jar are. Well, this is a burlap twist on those popular gifts. When decorating your jars, add burlap to the top and then some twine or jute rope for tying. You can use smaller jars and give them away as party gifts or create larger ones and use as gifts for special occasions. The burlap really gives the jars a homey look and you can fill them with your favorite recipes or even jellies, jams or any other yummy goodness.
DIY Instructions – Tinyprints 
Burlap and Mason Jar Storage
Old mason jars and some burlap work really well together in creating this wonderful storage shelf that you can use in bathrooms, kitchens or anywhere you need it. You simply cover a piece of wood with burlap and then affix your jars, which will need to be secured with clamps. These are great for holding Q-tips and cotton balls in the bathroom or you could use them in the kitchen for housing your wooden spoons. The entire project takes less than an hour and gives you a beautiful storage solution.
DIY Instructions – Putitinajar
Burlap Owl Wall Hanging
The kids are going to love helping you to create this whimsical owl from burlap. You need burlap, felt and a few craft supplies and then you can hang your little owl on his own tree branch. Frame it and you have a beautiful wall hanging that is sure to bring a smile to everyone who sees it. This project does not require any sewing. You can glue everything together with a hot glue gun and it’s so easy that you may end up adding more than one owl to your little tree.
DIY Instructions – Urbanhoot
Burlap Picture Matting
If you really want your pictures to stand out when you hang them, replace the matting behind them with burlap. This is a great way to make your entire photo display look rustic. You can purchase frames at the Dollar Store for around a dollar each and then make them really special by adding the burlap and some scrapbooking paper to create a unique mat for each picture. You don’t have to sew or even glue for this one. Just add the burlap and then the picture and the glass from the frame will keep it all in place.
DIY Instructions – Twostorycottage
DIY Burlap Advent Calendar
You can create a beautiful Advent calendar using burlap or you could turn this into a Christmas countdown calendar if you wanted. Actually, you could use it as a normal calendar if you want, just be sure to add a label for each month. If you are making and Advent calendar, you can fill the numbered pockets with small candies or gifts or use plain labels instead of pocketed ones to create a regular calendar. Either way, this is a really easy project and one that won’t cost much, either.
DIY Instructions – Onsuttonplace
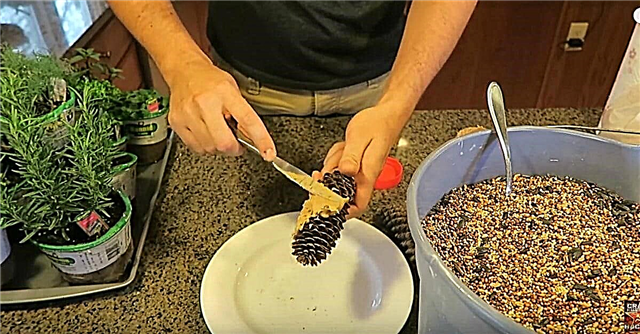
Burlap Christmas Trees
These beautiful burlap Christmas trees are inspired by Pottery Barn but they cost much less. You can do these in alternating colors or alternate the burlap with canvas to make them a bit unique. You can make them as tall or short as you want, depending on the size of the cones that you use and you can make them fuller by simply adding more fabric. Once you’re finished, decorate if you want or just leave them plain. There is no sewing required so this is a project that everyone can do and the kids will love to help with it.
DIY Instructions – Myhappynest
Burlap Boot Stuffers
Ok, so this is not technically a décor project but it’s a very helpful one anyway. These burlap boot stuffers are great because they are quick and really inexpensive to create and they work perfectly for keeping your boots from drooping. Two boot stuffers takes only a yard of burlap to create so you can make several of these if you have more than one pair of boots. These are also great for gifts and there is very little sewing required.
DIY Instructions – Shinewithjl